> ## Documentation Index
> Fetch the complete documentation index at: https://danswer-mintlify-deep-research-1773355783.mintlify.site/llms.txt
> Use this file to discover all available pages before exploring further.
# Website Widget
> Deploy the Onyx chat widget on your website
The Onyx Website Widget allows you to embed AI-powered chat directly on any website.
Features include:
* Lightweight \~100-150kb gzipped bundle
* Fully customizable colors and branding
* Responsive design (desktop popup, mobile fullscreen)
* Real-time streaming responses via SSE
* Session persistence across page reloads
## Deployment Options
### Cloud Deployment (Recommended)
For Onyx Cloud users, the widget is served from Onyx's CDN. Simply add the following to your website:
```html theme={null}
```
### Self-Hosted Deployment
For self-hosted Onyx instances, you'll need to build and host the widget yourself.
Clone the [Onyx repository](https://github.com/onyx-dot-app/onyx) from GitHub.
```bash theme={null}
cd widget/
```
```bash theme={null}
npm install
```
Navigate to your Onyx admin panel and create a new API key specifically for the widget.
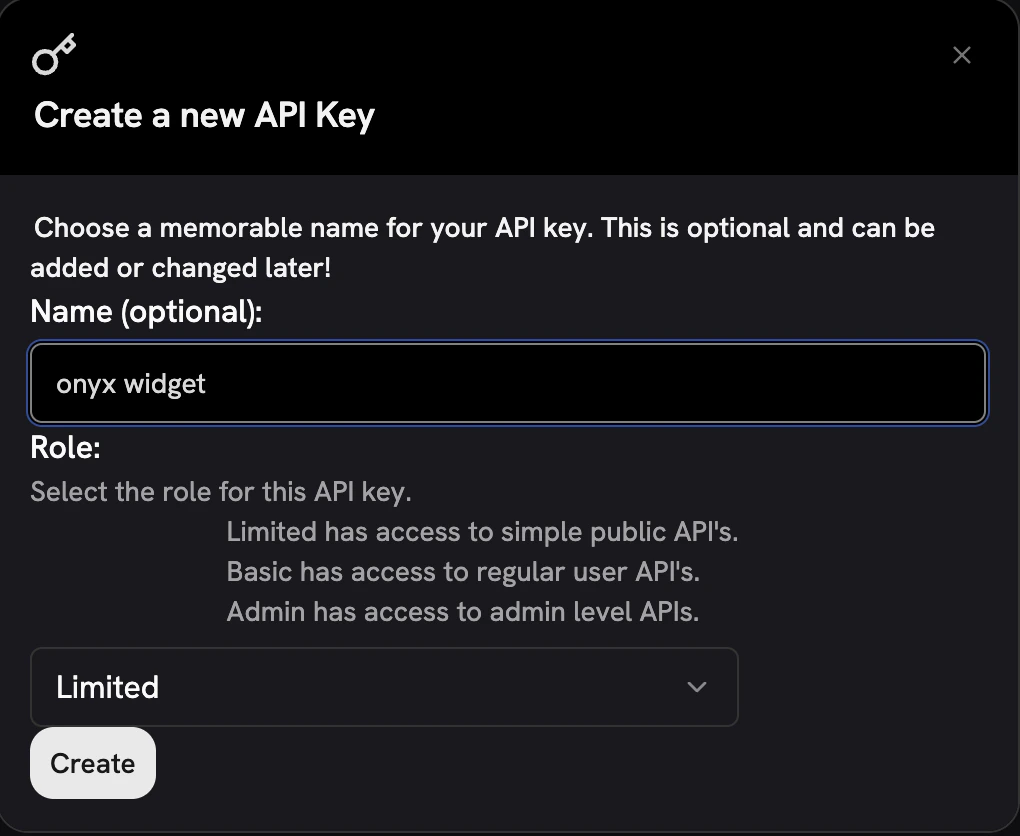 Create a **limited-scope API key** with only chat permissions.
Never use admin or full-access keys since the API key will be visible in client-side code.
For builds with baked-in configuration, create a `.env` file:
```bash theme={null}
cp .env.example .env
```
Edit `.env` and set your backend URL and API key:
```
VITE_WIDGET_BACKEND_URL=https://your-backend.com
VITE_WIDGET_API_KEY=your_api_key
```
For **cloud-style deployment** (config via HTML attributes):
```bash theme={null}
npm run build:cloud
```
For **self-hosted deployment** (config baked into bundle):
```bash theme={null}
npm run build:self-hosted
```
Upload `dist/onyx-widget.js` to your CDN or web server.
### Customer Embed Code
After deployment, provide customers with the embed code:
**Cloud-style (attributes required):**
```html theme={null}
```
**Self-hosted (config baked in):**
```html theme={null}
```
## Configuration Reference
### Required Attributes
| Attribute | Type | Description |
| ------------- | ------ | -------------------------- |
| `backend-url` | string | Your Onyx backend API URL |
| `api-key` | string | API key for authentication |
#### `backend-url`
The URL of your Onyx backend API. This is where the widget sends chat requests.
* **Onyx Cloud**: Use `https://cloud.onyx.app` or your tenant-specific URL
* **Self-hosted**: Use your Onyx instance URL (e.g., `https://onyx.yourcompany.com`)
```html theme={null}
```
#### `api-key`
A valid Onyx API key for authenticating widget requests. **This key is visible in client-side code**,
so always use a limited-scope key.
```html theme={null}
```
For self-hosted builds with baked-in config,
`backend-url` and `api-key` can be set via environment variables during build instead of HTML attributes.
### Optional Attributes
| Attribute | Type | Default | Description |
| ------------------ | ------ | ------------- | ---------------------------------------- |
| `agent-id` | number | `undefined` | Specific agent/persona to use |
| `agent-name` | string | `"Assistant"` | Display name in header |
| `logo` | string | Onyx logo | URL to custom logo image |
| `primary-color` | string | `#1c1c1c` | Primary brand color (buttons, accents) |
| `background-color` | string | `#e9e9e9` | Widget background color |
| `text-color` | string | `#000000bf` | Text color (75% opacity black) |
| `mode` | string | `"launcher"` | Display mode: `"launcher"` or `"inline"` |
## API Key Security
The widget's API key is exposed in client-side code. Always create a dedicated API key with:
* **Limited permissions** - Only chat access, no admin features
* **Rate limiting** - Prevent abuse from malicious actors
* **Monitoring** - Track usage and detect anomalies
In your Onyx admin panel, create a new API key with minimal permissions.
Configure rate limits appropriate for your expected usage.
Regularly review API key usage for unusual patterns.
## Browser Support
* Chrome/Edge 90+ (Chromium)
* Firefox 90+
* Safari 15+
* Mobile Safari (iOS 15+)
* Mobile Chrome (Android)
**Need help with setup?** Contact your Onyx administrator for API key configuration or deployment assistance.
Create a **limited-scope API key** with only chat permissions.
Never use admin or full-access keys since the API key will be visible in client-side code.
For builds with baked-in configuration, create a `.env` file:
```bash theme={null}
cp .env.example .env
```
Edit `.env` and set your backend URL and API key:
```
VITE_WIDGET_BACKEND_URL=https://your-backend.com
VITE_WIDGET_API_KEY=your_api_key
```
For **cloud-style deployment** (config via HTML attributes):
```bash theme={null}
npm run build:cloud
```
For **self-hosted deployment** (config baked into bundle):
```bash theme={null}
npm run build:self-hosted
```
Upload `dist/onyx-widget.js` to your CDN or web server.
### Customer Embed Code
After deployment, provide customers with the embed code:
**Cloud-style (attributes required):**
```html theme={null}
```
**Self-hosted (config baked in):**
```html theme={null}
```
## Configuration Reference
### Required Attributes
| Attribute | Type | Description |
| ------------- | ------ | -------------------------- |
| `backend-url` | string | Your Onyx backend API URL |
| `api-key` | string | API key for authentication |
#### `backend-url`
The URL of your Onyx backend API. This is where the widget sends chat requests.
* **Onyx Cloud**: Use `https://cloud.onyx.app` or your tenant-specific URL
* **Self-hosted**: Use your Onyx instance URL (e.g., `https://onyx.yourcompany.com`)
```html theme={null}
```
#### `api-key`
A valid Onyx API key for authenticating widget requests. **This key is visible in client-side code**,
so always use a limited-scope key.
```html theme={null}
```
For self-hosted builds with baked-in config,
`backend-url` and `api-key` can be set via environment variables during build instead of HTML attributes.
### Optional Attributes
| Attribute | Type | Default | Description |
| ------------------ | ------ | ------------- | ---------------------------------------- |
| `agent-id` | number | `undefined` | Specific agent/persona to use |
| `agent-name` | string | `"Assistant"` | Display name in header |
| `logo` | string | Onyx logo | URL to custom logo image |
| `primary-color` | string | `#1c1c1c` | Primary brand color (buttons, accents) |
| `background-color` | string | `#e9e9e9` | Widget background color |
| `text-color` | string | `#000000bf` | Text color (75% opacity black) |
| `mode` | string | `"launcher"` | Display mode: `"launcher"` or `"inline"` |
## API Key Security
The widget's API key is exposed in client-side code. Always create a dedicated API key with:
* **Limited permissions** - Only chat access, no admin features
* **Rate limiting** - Prevent abuse from malicious actors
* **Monitoring** - Track usage and detect anomalies
In your Onyx admin panel, create a new API key with minimal permissions.
Configure rate limits appropriate for your expected usage.
Regularly review API key usage for unusual patterns.
## Browser Support
* Chrome/Edge 90+ (Chromium)
* Firefox 90+
* Safari 15+
* Mobile Safari (iOS 15+)
* Mobile Chrome (Android)
**Need help with setup?** Contact your Onyx administrator for API key configuration or deployment assistance.